This easy upcycled decor idea will help repurpose primitive country decor into modern farmhouse chic.
If you grew up (or were decorating your space) in the late 80s/early 90s, this thrift store find will take you back… That is, back to a time where floral wallpaper, dark plaid cafe curtains, rustic stencils, and black sheep dominated home decor.
It was also a time of green gingham couches and pine furniture filled living room spaces. And, you might even remember these little houses.

I found this set of houses at a thrift store recently for $4. When I spotted them, I was instantly reminded of these by Hearth & Hand with Magnolia.
I’m sure there’s a crafty lady somewhere who actually hand-painted these little houses decades ago. And now, I’m going to update them from country prim to modern farmhouse.
As a result, these crafty houses will live on to see another day. Thanks crafty lady from the 90s.

*This post may contain some affiliate links for your convenience. Robb Restyle may receive a commission, but you won’t pay a penny more. Thanks for supporting our flea market addiction. Click here to view our disclosure policy.*
Here’s what you’ll need:
- Sand paper or a similar finishing sander
- DecoArt Color Stain in chocolate and black
- Coping saw and/or multi-tool
First you’ll want to sand off the painted letters. Then give the entire piece a good sanding. Also, I removed the chimney that was glued to the top of the W house. The roof paint proved to be very stubborn. More on that later.

I do not like working with traditional stain. I’m messy and I don’t really like wearing gloves. But this Color Stain from DecoArt is water-based, easy to work with, and dries with its own topcoat. And you know how I love a good one-step product!
I added a coat of the chocolate color stain and let it dry. I was surprised that the roof color was still showing through and I really wanted these to have more of a natural wood finish, so I decided to add a coat of black color stain on top.

That was EXACTLY what these little houses needed. I really, really liked how the black stain darkened the brown coat. You could no longer tell that the roof was blue or red. 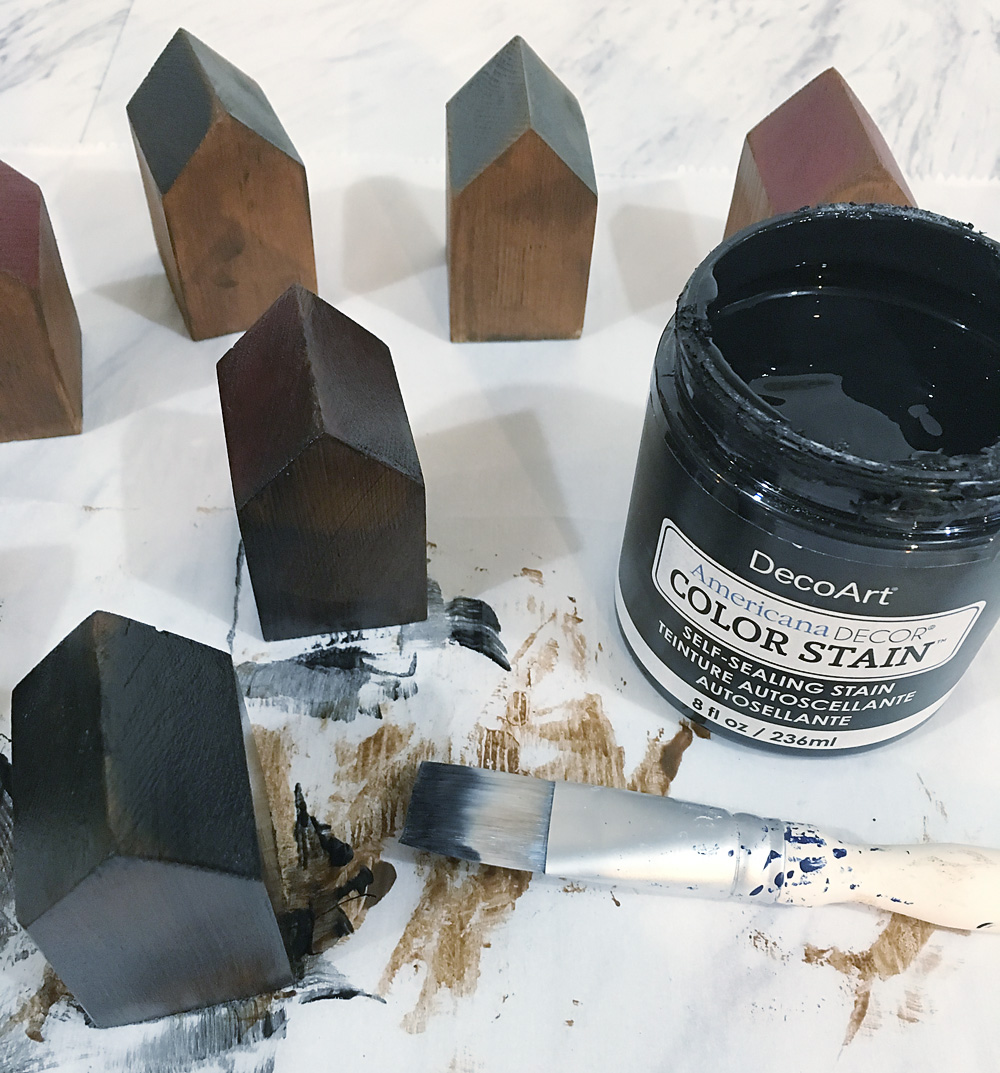
The next step can be tricky… that is, if you want to keep all your digits. My husband is more experienced with these tools, so he helped me slice the place card holder in the roof. He used the multi-tool for the initial cut, then used a coping saw to stretch it a bit and get rid of the rough edges. NOTE: You may need to use a paint brush to fill in the hole with black color stain after making the cuts.
Here are all the steps in a nutshell.

All in all, there’s really nothing to it. I got all of 7 these houses for just $4 and they sell for $3 each at Target, so that’s a pretty thrifty upcycle project, right?!

Now, just print out some place cards and you’re all set. I’ve even created a free printable for you!
Download Free Place Card Printable
This will be such a cute addition to your table setting.

GIFT IDEA: You could also give these little houses away as gifts with one of your favorite recipes tucked inside instead of a place card. Or, print a square photo from your instagram account and mount it in the little house… endless possibilities!

Group a few vintage thermoses together on a galvanized metal tray – and you’ve got the perfect modern farmhouse table centerpiece to go with your new upcycled house place card holders.

I hope you enjoyed this easy and thrifty upcycle project.

This is a really cute idea, Kristy! I thought, if someone wasn’t very good with tools (like me!), that you could paint the roofs with chalkboard paint and use chalk to
write on the place card.
Nadine
oh my goodness Nadine! I wish I could reach over the interwebs and give you a high-five!! That’s a fantastic idea!