• Skip to primary navigation
  • Skip to main content
  • Skip to primary sidebar
  • Skip to footer
  • Home
  • Blog
    • Vintage Love
    • DIY + Crafts
    • Home Projects + Makeovers
    • Decorating Ideas
    • Furniture Flips
    • Pop-Up Shops
    • Seasonal Decor
    • Good Things
  • Home Tour
  • Shop Our Home
    • Amazon Favorites
    • Holiday Shop
  • About
  • Work With Us
    • Email Kristy
    • Marketing + Design Services
    • Disclosure Policy
    • Privacy Policy
  • Nav Widget Area

    • Facebook
    • Instagram
    • Pinterest

Robb Restyle

DIY | Decorating with Flea Market and Vintage Finds

You are here: Home / Projects / Home Projects + Makeovers / DIY Backyard Hideaway Playhouse Part 1

July 25, 2014

DIY Backyard Hideaway Playhouse Part 1

Every summer has a story. And this summer our story is about a backyard playhouse retreat for our kiddos. This story isn’t over yet, but I’m going to share our construction adventure. Really, I’m not sure if this story will ever end for us (if only I could stop my kids from growing up), but the next few chapters include paint and finishing touches and eventually an outside sleepover – who needs a tent when you have a roof over your head!

 So here’s a little disclaimer before we begin. We’re mostly in the business of renovations, not construction projects, so it was a big challenge for us to build something like this from the ground up. We even had to channel some seldom-used math skills for the project… but we did it. HUGE props go to our inspiration the Handmade Hideaway, from the Handmade Home. They broke up the project into a few blog posts. Their posts and supply list combined with a few YouTube videos helped us accomplish this backyard playhouse in a little over a week.
We wanted to encourage our two boys to spend more time outdoors (as an alternative to playing video games). However, our current swing set just wasn’t cutting it. This is the only picture I could find of the old playhouse. Obviously the winters had been hard on it. It was a hand-me-down and had survived many good years. But our 8 and 10 year olds had outgrown it and the little playhouse on the ground.
I discovered the Handmade Hideaway on Pinterest and immediately feel in love with it. I shared the picture of it with my kids and they were immediately excited about it too. After our minds were made up, we showed dad, the builder. He wasn’t so sure about building this type of structure – not to mention tackling a roof… but he accepted our challenge after a little whining and even more encouragement.
So after our supplies were delivered from Lowe’s, Corey and one of his little helpers got started. Because we live in Indiana, we inserted our poles into the ground with a little concrete. I loved that my little one was working alongside his dad to help him with what Corey would call the hardest part of the whole project.

Here is a summary of our progress over the entire 8 days of construction.

Day 1 – Poles in the ground and leveled.
Day 2 – All framed up.
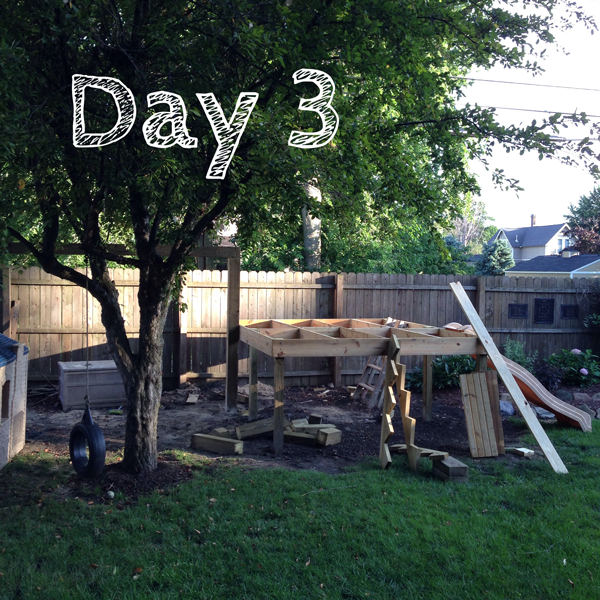
Day 3 – Framing for the floor and poles for the swing set are in place.
Day 4 – We have a floor and stairs!
Day 5 – Stairs are complete and wall frame is in place.
Day 6 – If these walls could talk.
Day 7 – Railing is added and walls are complete.
Day 8 – Raise the ROOF!
We were lucky to have 8 days in a row without rain – and possibly the coolest weather days of the summer because during this time we were treated to another Polar Vortex – no joke.
So, I know in the picture below that the roof wasn’t even on yet, but I wanted to contribute (he claimed he didn’t need my strength for the roofing part)… I went inside and sewed up a few cute little banners for the outside railing. My husband is so patient with me. He is probably surprised I waited that long to start decorating… seriously my favorite part of this whole project.
I am so proud of Corey for taking on this challenge, working through the trials and tribulations, and for not cursing me for signing him up for this project! LOL. At least not that I could hear. He expertly used scraps and leftovers to build them into the railing and roof – it’s simply in our blood to repurpose and reuse wherever we can.
As you can see, our finished playhouse varies a bit from the Handmade Hideaway. But that’s what’s great about it. The plans were flexible enough that we could incorporate our own style and details.
Our kids love to swing, so we included a swing set to the left of the playhouse. We also kept our slide from the old structure and added it to the right. For our version we used corrugated steel for the roof. We really like how it ages over time and adds a rustic style to the playhouse.

Oh, and to top this little project off… We were lucky enough to meet The Handmade Home’s Jamin and Ashley in person at the Haven Conference. We shared playhouse stories over cocktails at one of the evening receptions. Hopefully we didn’t seem like blog stalkers (um, we probably did) but it was so refreshing to put faces to the blog posts we had been pouring over the weeks before the conference.

I was informed near the end of construction that I cannot paint the treated lumber right away. Big bummer… So I just did a little decorating (seriously, I had to hang a few items up at least).  I just added a little decor we either picked up at the flea market or found while dumpster diving to help cozy up the space. The chairs and rug were on sale at Lowe’s and fit our color scheme perfectly.
When the wood is finally ready for paint, the boys picked out a fantastic shade of blue to go on the walls. The railings and stair kick plates will be painted white.
Our backyard paradise is complete.
Adult Space = Check!
Kid Friendly Space = Check!
And now the horseplay can begin. Boys will be boys.
Stay tuned for Part 2… paint! Hopefully I can find some nice weather this fall to finish it up and add a little more decor. But for now, it’s a great space to hang out, play fort, eat ice cream cones, make evil potions, and more!

Filed Under: Home Projects + Makeovers Kristy Robb

Reader Interactions

DIY Ottoman Restyle
Decorating a Chalkboard Accent Wall with Vinyl

Comments

  1. Run To Radiance says

    July 25, 2014 at 7:59 pm

    I love it!!! You all did a great job!!!

  2. Kristy Robb says

    July 28, 2014 at 2:57 am

    Thanks Tania!

  3. Anonymous says

    July 30, 2014 at 6:31 pm

    You and Corey are truly amazing. I want to come visit and sleep in it this autumn. You both did a fantastic job on this. Love, Aunt Pat

  4. Kristy Robb says

    July 31, 2014 at 4:46 pm

    Aw, thanks Aunt Pat – love and miss you too!!

  5. Abby says

    March 18, 2016 at 12:57 pm

    Any chance you have the rough measurements of the playhouse? Just the width and depth?

    • Kristy Robb says

      March 18, 2016 at 1:03 pm

      Sure, it’s 10×6.

Primary Sidebar

Meet Kristy

Robb Restyle Hi there friend!
I'm so glad you're here. My name is Kristy and together with my husband Corey, we are DIY enthusiasts restyling our 1914 Indiana home and hunting for architectural salvage. We love sharing eclectic home decorating ideas for your vintage finds, retro furniture rehabs, and savvy advice for restyling your home - we're creating champagne style on a beer budget. Read More!
  • Facebook
  • Instagram
  • Pinterest
  • Twitter
  • YouTube

AS SEEN IN

Robb Restyle Magazine Feature

Looking for something?

Archives

© Kristy Robb and Robb Restyle, 2026. Unauthorized use and/or duplication of this material without express and written permission from this blog’s author and/or owner is strictly prohibited. Excerpts and links may be used, provided that full and clear credit is given to Robb Restyle with appropriate and specific direction to the original content. Please only use one picture with a link back unless individual permission is given otherwise by Robb Restyle. Full disclosure here.

Footer

Helpful Links

  • Blog
  • Shop Our Home
  • Work With Us
  • Disclosure Policy
  • Privacy Policy

Search

Archives

Categories

© 2015 Pretty Happy WordPress Theme · By: Pretty Darn Cute Design