
Last fall I discovered this unique shower curtain from DENY and immediately fell in love with it! I’m telling you, this brand has the most amazing shower curtain designs I have ever seen. I actually fell in love with several designs… there are curtains with clever quotes or sayings with the most amazing designs, photos and color combinations. It reminds me of hanging a fun poster in your bathroom – only its on a fabric shower curtain. You can find this brand online at places like Wayfair and Kohls.com. Ok, now onto my project…

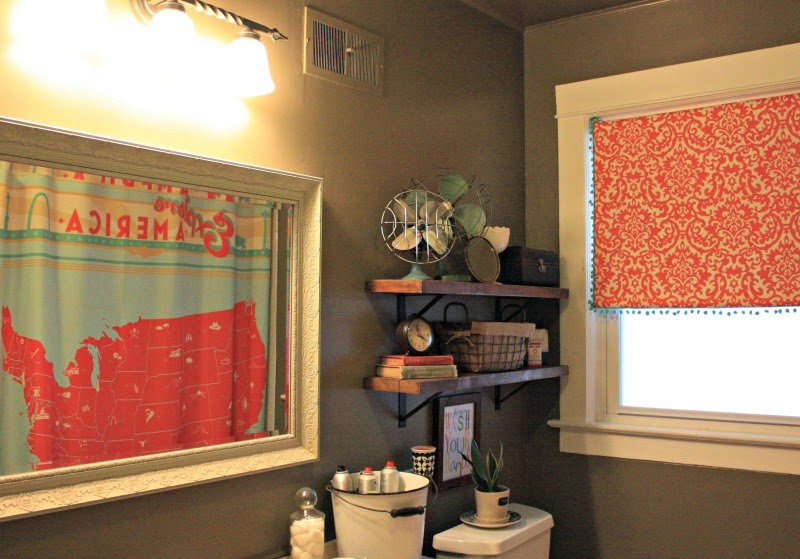
Old house = no master bath. Thus, the little boys and I split this upstairs bathroom while the hubby uses the shower downstairs. Since it is a bathroom shared with kiddos, I have always tried to decorate with whimsical shower curtains. I loved the minty teal and coral colors, plus it pays a special nod to Corey’s former life as a geography teacher. The kids love to point out the places we’ve been or the places we’ll go. It’s both adorable and fun.
I wanted to add more minty/coral colors in my bathroom without painting the walls again… we are not ready to tackle that project until we find a vintage dresser to repurpose as a sink vanity. That really only leaves the window covering. And so it goes.

I am so excited to share this speedy DIY project with you. I was totally inspired by this project from the talented Young House Love bloggers. But, I thought that I might want to raise and lower the shade, so I tweaked it a little to fit an inexpensive roller shade instead.

Supplies Needed:
- Roller shade cut to fit your window
Note: We purchased ours for about $14 from Lowes but he measured it incorrectly (more on this later) so I recommend bringing your own measuring tape with you – like I will be doing next time. Grrr.
- Fabric to fit the length and width of the window (+ an inch or so seam)
- Fabric adhesive and some sharp scissors
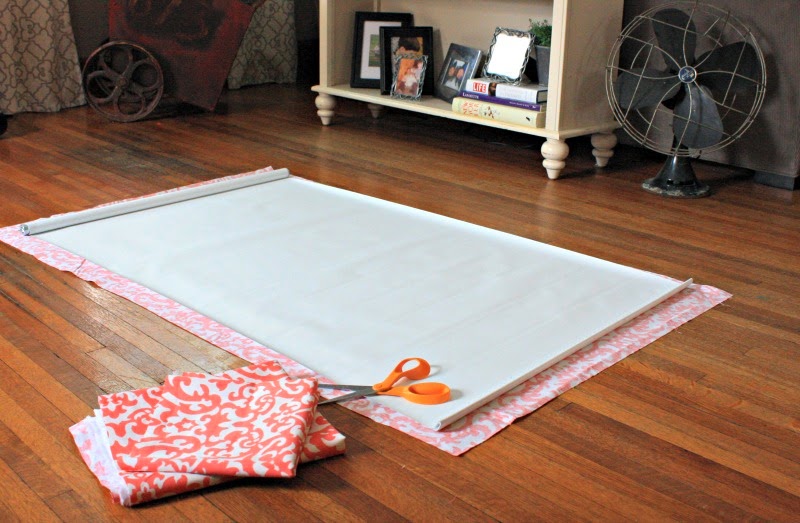
Basically I began by rolling down my shade to a point that was a few inches past the length of my window and laid it flat on the floor – it is my largest workspace available! Whenever I start laying projects on the floor, my two curious helpers are always nearby.
Once the material is trimmed, simply apply fabric adhesive to the edges and press the fabric to the shade. I started at the top (where it is rolled up) since that area won’t be seen. The liquid stitch is very strong, but when I got to the end of the shade I noticed that I had to press the corner seams for about 30 seconds to make sure they adhered over the existing fabric seam.

I let my project dry (on the floor) for about 30 minutes, then summoned my husband for installation. AND…….. That’s when we realized this shade was at least an inch short in width. Seriously.
{Note to self: remind Lowe’s employee to measure twice, cut once}
Oh, and I remeasured the window to be sure. My husband confirmed that my measurements were correct. Kristy = 1, Lowes = 0
It wasn’t really an option to remove the fabric from the shade and I definitely didn’t want to purchase more fabric, which would totally cancel the thrifty portion of this DIY project. I had just recently purchased some minty teal pom pom trim for another project and color match was spot on. I hoped this would add an illusion to the edges – hiding the gaping light that escaped from the incorrectly measured shade.
Sometimes you just gotta roll with it.

At this point I was feeling a bit lazy and ready to be finished, so I simply used a hot glue gun to apply the trim.
I am pleased with the results. Although I still very much notice the gaping light on the sides… whatever… I am really digging the pop of color!


Great job, Kristy! I do love your choice of fabric. I just think that it’s really fabulous. You did it without even lifting a needle and thread? Wow! Now that’s amazing. The overall effect of it all really brings out the personality of your bathroom. It’s nice and vibrant without being tacky. 😀
Taylor Allen @ Sunburst Shutters Arizona
Thank you so much Taylor! I love that fabric too – wish I could find more places in my home for it. We are in the middle of a kitchen remodel and I would love to work with Sunburst Shutters on some ideas for the kitchen windows. 🙂