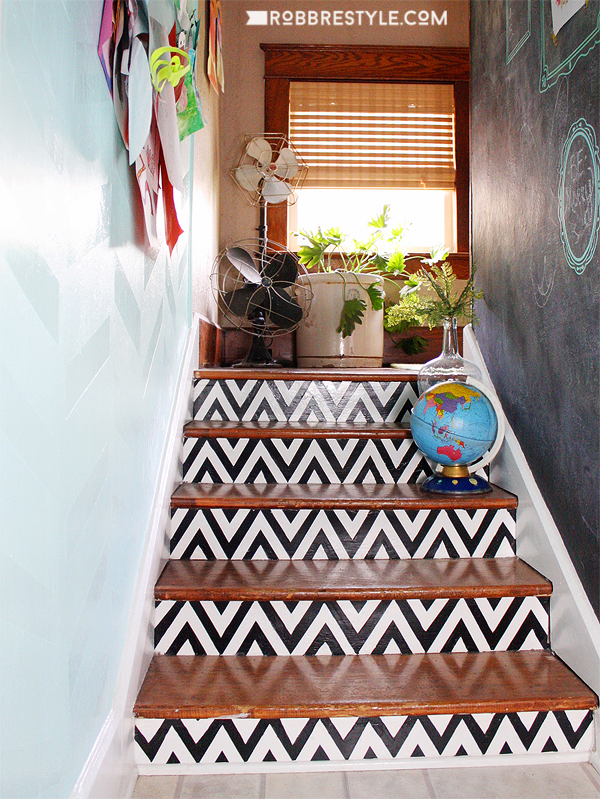
From the moment I spied with my little eye this pin on chevron stairs, I was in love. It’s no secret how much I adore everything chevron. I realize that many of you may soon tire of this fantastic geo pattern, but I’m positive I never will. And for my small kitchen staircase, it’s just what I needed to bridge together my newly painted walls. All it took was a #polarvortex blizzard (which closed my office for two days) to give me the inspiration time I needed to complete this little DIY adventure.
This isn’t the first time I’ve painted this little stairway. Remember my obsession with numbers?

For those of you who already saw the finished project on my Facebook page, I thought I would provide some details on how I accomplished it.
Disclosure: This is probably what I would consider an expert DIY project – not for the faint of heart. It will take a lot of time and patience to complete. I would recommend trying it on a small set of stairs or only do every other kick plate on a full set of stairs. You will curse and want to quit before you are finished (some tears may even result). But it is possible to do and well worth the results. Just sayin’.
The Tools:
- Exacto Knife (sharp)
- Triangle Template (stiff – like foamboard)
- Pencil
- 1″ Painter’s Tape
First, I created a little triangle guide out of foam core to trace onto the stair kick plates. Since I’m not an exact measurer, I guessed and created a roughly 4 inch triangle about 1 inch wide and it turned out to be a good fit. You might prefer to be more accurate, but I’m more of a doer than a measurer…

I traced the the outer edge only of the triangle across the kick plate. Next I placed the edge of my painter’s tape along that penciled line. Then I just used that tape triangle as a guide for the rest of the triangles. I’m very accustomed to eyeballing things so I guessed what looked like an inch in spacing and taped another triangle – overlapping the ends. This will give you a perfect straight line to cut across. It is probably best to tape it all then go back to trim off the excess.

Using a very sharp Exacto knife, you shouldn’t need to press very hard to cut through your tape. You don’t want to cut through you base layer of paint. Peel away the excess.


In my experience with taped patterns, it is best to start with a base coat over all your tape. This will help seal the tape and hopefully protect your pattern from bleeds of the next color. Here is the first coat of white drying.

This little staircase leads up to a landing with a small staircase into my living room and a larger staircase leading upstairs. These walls are only partially visible from the kitchen so I tried something bold and painted one side chalkboard paint and the other side a kitchen blue with a glossy herringbone pattern. We love using the chalkboard for our reminders, menu planning, drawing pictures, etc. And because it wouldn’t be complete without it… I used my Silhouette Cameo to create some frames and messages scattered on the wall.


The other wall is painted the same blue as the eat-in dining area next to our kitchen. It’s is daunting amazing how many papers and projects my kids bring home from school on a regular basis. I chose this wall to display all that paper and artwork with a metal clip hanger chain I found on Decor Steals… it’s a great way to display them without cluttering up my fridge and countertops. Win-Win!

You can’t really see it, but there is a light high-gloss pattern on the wall. I went to the trouble of doing this last summer…

I painted a high gloss version of my wall color inside this pattern. My sister-in-law did something similar in her home and I loved it! The idea of a subtle pattern to make this wall more interesting was appealing. Unfortunately this taping picture is more dramatic than the results. Since there isn’t much light in this hallway, the pattern is barely visible… FAIL!
Anyhow, all this led me to paint my chevron stair pattern black to merge the chalkboard wall on the right with the subtle herringbone/chevron pattern on the left. I painted 2 coats of black chalk paint. My expert painter husband recommended it since a glossy black is hard to work with.

Back to my disclosure in the beginning… this is where some tears may or may not have fallen. After sufficient drying, I gently pulled the tape off. And with it, some paint. And then some more paint. I’m sharing the next photo with you because I want you to know that you can fix it… curse if it makes you feel better (I know it helps me) or get a glass of wine and walk a way for a bit… or both.

Then come back with your little paint brush and start filling in the gaps. It’s worth it. Don’t give up now. Up close, on your knees or even on your stomach with your nose next to the kick plate as you try to paint a straight line, you will notice flaws. You will. But I promise you, no one will ever be that close to your steps. Frequently get up and take several steps back. Look at it from a short distance. This is where the magic happens. The flaws won’t be noticeable. This will motivate you to the end…


*This post may contain some affiliate links for your convenience. Robb Restyle may receive a commission, but you won’t pay a penny more. Thanks for supporting our flea market addiction. Click here to view our disclosure policy.*
Gorgeous! I love your stairs and chalkboard paint! Awesome job! Thanks so much for linking up at Thursday STYLE!!
That looks so awesome. I know how frustrating painters tape can be – even the good stuff. When I did our powder room I was nose-to-the-wall touch up painting so I feel ya on that. 🙂 Thanks for linking up at Thursday STYLE!
I want to rip the carpet off my staircase right now and get painting! So cool! Love it!
Thank you so much Amanda!
Holy Cow this is awesome!!!! I’m pinning it to our board! Thanks for sharing on DIY Sunday Showcase!!
Shelly
minettesmaze.blogspot.com
Thank you all so much! I appreciate your kind words!
You did a fantastic job. That is a lot of work but it turned out beautifully. Ann Marie @ Iris Abbey
Wow! These stairs look AH-MAZING! You did an incredible job and it makes such a difference in the space. Thanks for linking up to The Makers! We hope to see you again next week.
~Katie @ Upcycled Treasures
Thank you so much!
Gorgeous! I absolutely believe that this is an expert level DIY. Sorry for the frustrations, but you did a great job and it has so much impact! Love it with the chalkboard wall. Thanks for linking up to The Makers! 🙂
What an amazing job! I’m so impressed, and now I wish I had some stairs to do this on;)
Thank you!
I love the stairs – great job! Lisa xo
Your stairs are AMAZING! I love them! Great job!
Thanks!
Awesome!
Thank you!
they look awesome, like tiles. I saw your feature on remodelaholics, and I had to come over and give you major props!
Thank you so much!
Awesome! This is one of the coolest staircases I’ve seen. So excited to be following your blog now.
Aw, thank you so much Jennifer!!
hi kristy,
did u first use black paint? Then made the pattern with tape? last step, white paint over the tape?
Thank you
Actually I painted the stairs white first, then taped the pattern and then painted the black pattern on.
Holy moly this is ambitious. And SO AWESOME! I am one of those who has sort of tired of chevron, but this makes me totally reconsider. I love how graphic and classic it is at the same time.
I found you via DwellingGawker and pinned and shared this. 🙂
Yay – I just joined DwellingGawker! Thank you so much! You are right, it does look more graphic than chevron.
Awesome job on your stairs, they are beautiful and so very unique, I am going to try and attempt something similar…thank you for sharing!
I also love the window treatment you have on the landing, it looks kind of like bamboo? Wondering where you bought it?
Thank you so much!